
Claude Code in Action
What is Claude Code?
What is a coding assistant?
‘이 에러를 고쳐주세요’ 같은 task를 받으면 LLM은
- Context를 가져와서
- 계획을 짜고
- 이를 수행
하는 절차를 거칩니다.
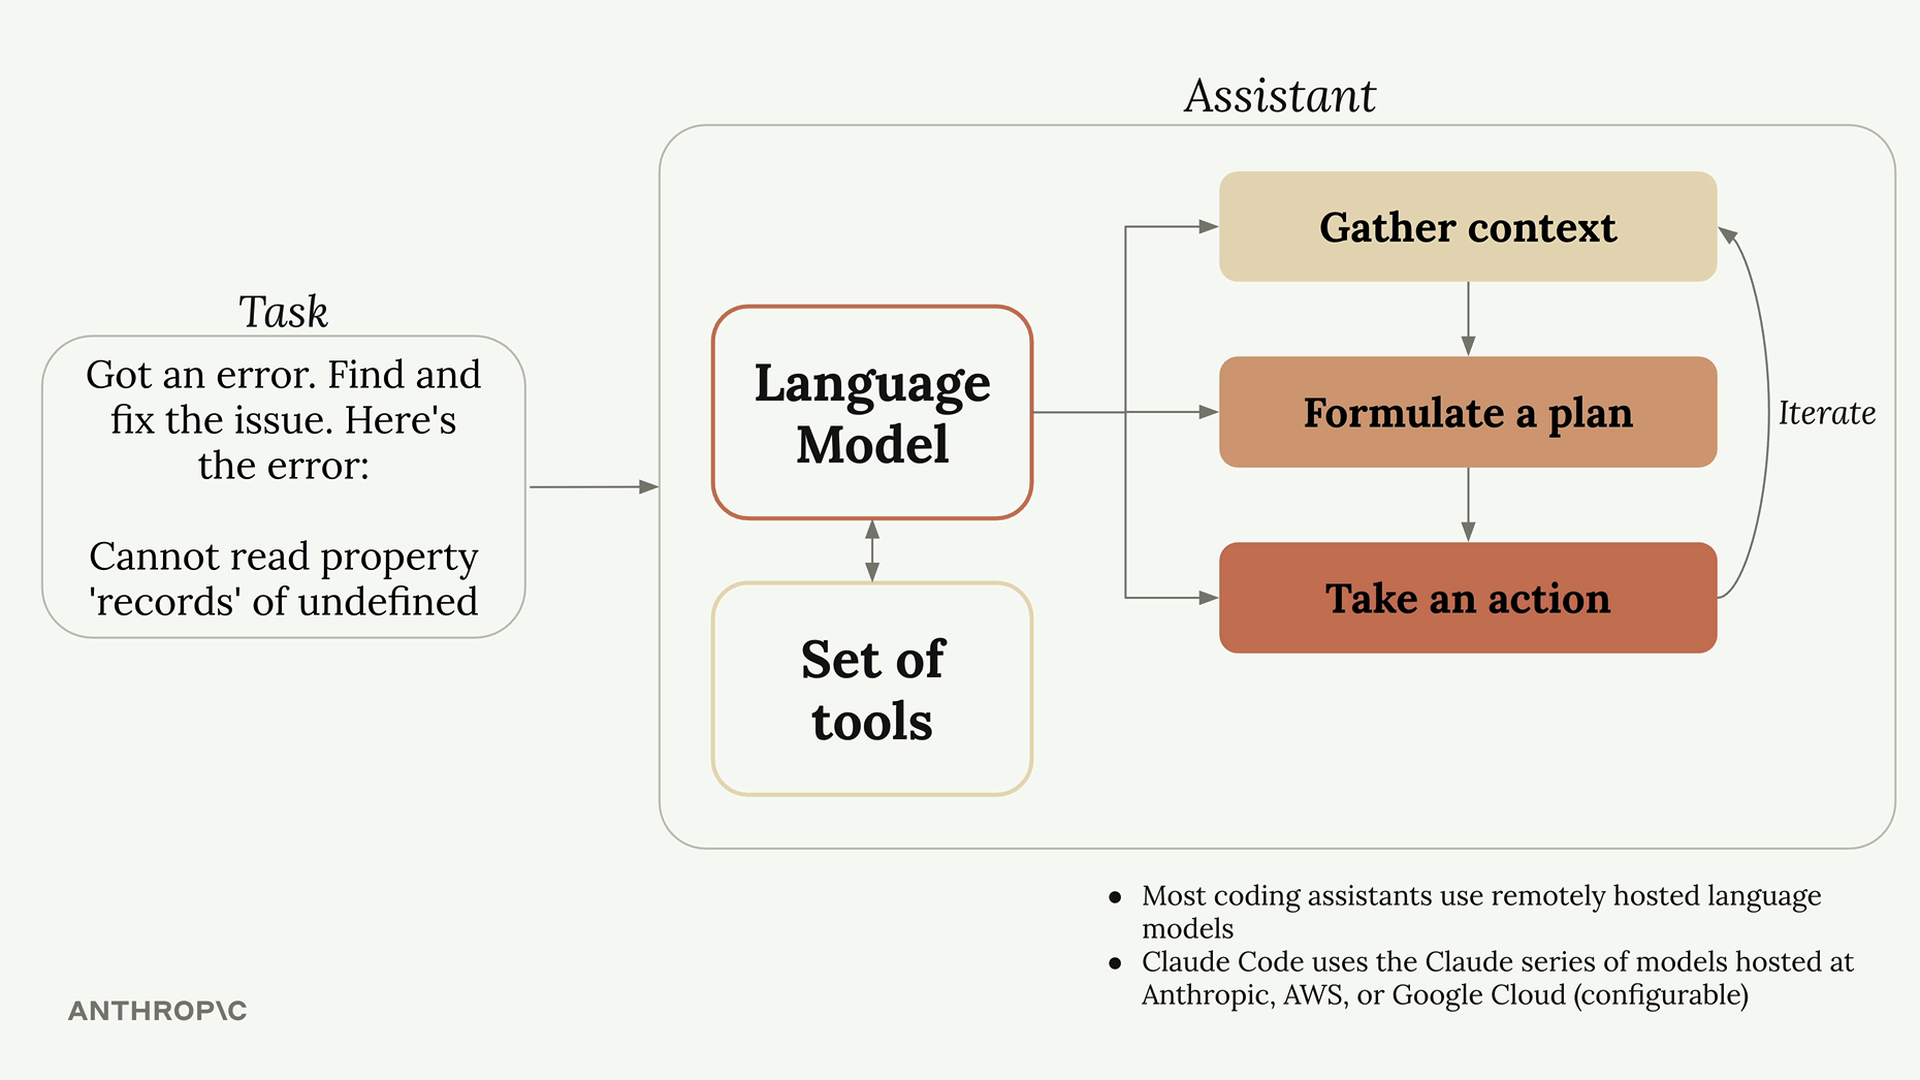
그리고 Context를 가져오고 계획을 수행하는 단계에서 (1,3)에서는 파일을 읽고, 수정하고, 커맨드를 날리고, 문서를 참고하느 등의 작업이 필요하게 됩니다. LLM에게는 이런 권한이 없기 때문에 아무 설정 없이 파일을 읽으라고 하면 “파일을 읽을 수 없습니다” 정도의 응답밖에 나오지 않을 것입니다.
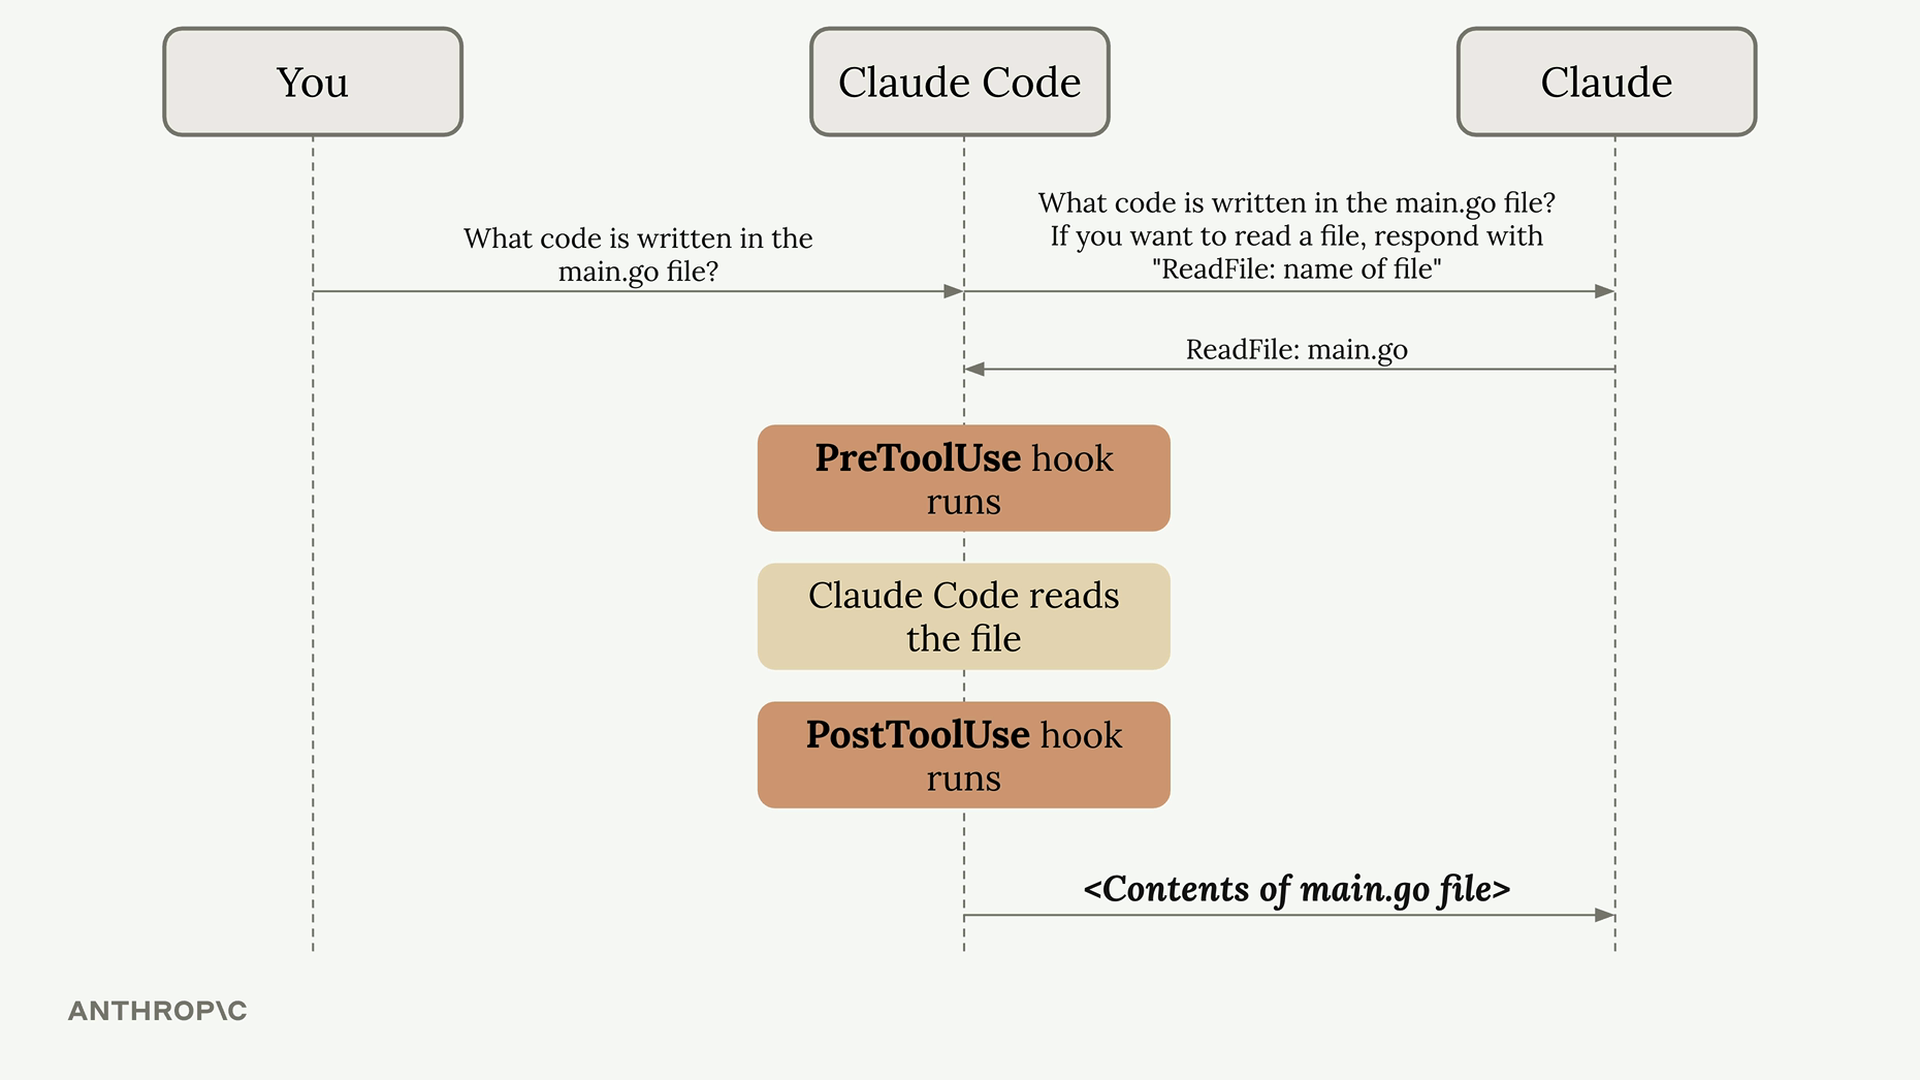
이 때 어떤 흐름을 만들어주게 되냐면 coding assistant가 LLM에 명령을 보낼 때 만약 파일을 읽어야 한다면 ‘특정 포맷으로 파일 이름을 알려줘’라고 명령을 합니다. 그러면 LLM은 해당 포맷으로 읽어야 하는 파일 이름을 보내고, coding assistant는 다시 해당 파일을 읽어서 내용을 LLM에게 보냅니다. LLM은 이 내용을 기반으로 기존에 받았던 task를 수행합니다. 이러한 작업을 Tool use 라고 표현합니다.
Tool use의 장점
- Tackles harder tasks - Claude can combine different tools to handle complex work and will use tools it hasn’t seen before
- Extensible platform - You can easily add new tools to Claude Code, and Claude will adapt to use them as your workflow evolves
- Better security - Claude Code can navigate codebases without requiring indexing, which often means not sending your entire codebase to external servers
Getting hands on
Claude Code setup
Project setup
제공하는 프로젝트(uizen)를 다운로드받거나 본인의 프로젝트 준비하기
Adding context
꼭 필요한 context는 넣으면서도, 상관이 없거나 잘못된 output을 만들 수 있는 context는 들어가지 않도록 하는 것이 중요.
/init 커맨드를 먼저 날리면 claude가 전체 프로젝트의 아키텍쳐등을 파악, 요약해서 claude.md 파일을 자동으로 생성해줌. 이 claude.md는:
- claude가 코드의 위치 등을 더 빠르게 파악하게 함
- 유저가 claude에게 일반적인 guidance를 제공하는 위치가 됨.
- claude에서
#을 치고 프롬프트를 입력하면 자동으로 ‘메모리 모드’가 되면서claude.md파일을 업데이트할 수 있음 - 어느 파일을 참고해야하는지 이미 알고있다면
@를 입력하고 파일을 지정해서 참고하게 할 수 있음. 이는claude.md내에서도 동일하게 사용 가능.
CLAUDE.파일의 층위
- CLAUDE.md - Generated with /init, committed to source control, shared with other engineers
- CLAUDE.local.md - Not shared with other engineers, contains personal instructions and customizations for Claude
- ~/.claude/CLAUDE.md - Used with all projects on your machine, contains instructions that you want Claude to follow on all projects
Making changes
스크린샷을 찍어서 ctrl + V (맥에서 cmd+v 아님에 유의!)를 해서 클로드에게 이미지를 제공할 수 있음
복잡한 변경이 필요할 경우 Shift+Tab을 두번 눌러 Plan mode로 들어갈 수 있음.
Plan mode가 실행되고 나면 claude가 계획을 제공하는데, 사용자는 이를 받아들여서 claude가 작업하도록 하거나 놓친 것이 있다면 추가적으로 가이드를 줄 수 있음.
또 다른 방법으로는 Thinking mode를 들어가게 할 수 있음.
- Think - Basic reasoning
- Think more - Extended reasoning
- Think a lot - Comprehensive reasoning
- Think longer - Extended time reasoning
- Ultrathink - Maximum reasoning capability
두가지 모드는 token을 추가적으로 소비하니 유의할 것
Planning Mode is best for (넓이):
- Tasks requiring broad understanding of your codebase
- Multi-step implementations
- Changes that affect multiple files or components
Thinking Mode is best for(깊이):
- Complex logic problems
- Debugging difficult issues
- Algorithmic challenges
Controlling context
esc를 누르면 claude의 동작을 끊을 수 있음. 무언가 의도한 방향과 다르게 가고 있을 때 이렇게 끊어주면 좋음.
같은 실수 (존재하지 않는 파일을 참조하려고 함)를 반복한다면 esc로 끊고 #의 메모리 모드를 사용해 claude.md에 올바른 파일 경로/이름을 알려주면 이와 같은 실수를 피할 수 있음.
A라는 task에 대해 a,b,c,d의 sub-task가 있었는데, b를 하다가 에러가 발생해서 이를 debug한 경우, 해당 에러를 해결하기 위한 내용이 context에 많아서 A와 c,d에 대해 집중하지 못할 수 있음. 이런 경우 esc를 두번 누르면 과거의 특정 시점이 대화로 돌아가고 그 사이의 대화를 무시할 수 있음.
이번에는 c를 하다가 에러가 나서 또 디버깅을 오랫동안 했다고 가정했을 때, A와 a,b,c,d에 대한 컨텍스트로 돌아가야 하지만 동시에 c를 디버깅하면서 알아냈고 다음 task를 개발하는데 사용할만한 정보가 많을 수도 있음. 이럴 때는 /compact 커맨드를 사용하면 됨.
완전 새로운 작업을 시작해서 이전 context를 비우고 싶을 때는 /clear 커맨드를 사용하면 됨.
Custom commands
claude code의 기본 커맨트 외에 자주 반복하는 작업이 있다면 나만의 custom command를 만들 수 있음.
- Find the
.claudefolder in your project directory - Create a new directory called
commands` inside it - Create a new
markdown filewith your desired command name (like audit.md)
Write comprehensive tests for: $ARGUMENTS

Testing conventions:
* Use Vitests with React Testing Library
* Place test files in a __tests__ directory in the same folder as the source file
* Name test files as [filename].test.ts(x)
* Use @/ prefix for imports

Coverage:
* Test happy paths
* Test edge cases
* Test error states
/write_tests the use-auth.ts file in the hooks directory 와 같이 argument를 넣어서 사용 가능.
주의: 파일 만들고 나서 cluade를 다시 실행해야 함
MCP servers with Claude Code
MCP 서버를 연결해서 Claude Code의 기능을 확장할 수 있음.
예를 들어 claude mcp add playwright npx @playwright/mcp@latest 커맨드를 터미널에서 입력해서 playwright의 mcp 서버를 연결, 로컬에서 띄우고 claude로 돌아가서 ‘브라우저를 띄워서서 localhost:3000로 연결해라’ 같은 명령을 줄 수 있음. 이 때는 permission이 필요한데, .claude/settings.local.json에 아래와 같이 항상 권한을 줄 mcp를 지정할 수 있음. (_가 두개임에 유의!)
{
  "permissions": {
    "allow": ["mcp__playwright"],
    "deny": []
  }
}
이전에 봤던 테크닉과 결합하여 다음과 같은 프롬프트가 가능함.
Navigate to localhost:3000, generate a basic component, review the styling, and update the generation prompt at @src/lib/prompts/generation.tsx to produce better components going forward.
GitHub integration
GitHub Action을 통해 동작하는 공식 integration이 존재함. claude에 /install-github-app 명령어를 입력하면 1. GitHub에 Claude Code 앱을 설치하고 2. 나의 API key를 등록한 후 3.workflow 파일들과 함께 PR을 생성함.
Mention Action
Issue를 등록할 때 @claude와 같은 식으로 claude를 부르면 claude가 해당 issue의 내용을 분석하고, 필요하다면 해당 codebase에 수정할 내용을 작성하여 해당 issue 에 답하거나 혹은 새로운 PR을 등록함.
Pull Request Action
새로운 PR을 올릴 때 PR을 리뷰하고 이 변경의 영향을 체크해서 해당 레포트를 PR에 등록해줌
Custom workflow
필요하면 본인의 레포만을 위한 workflow를 만들 수 있음.
- Project Setup ```yml
- name: Project Setup run: | npm run setup npm run dev:daemon ```
- Custom Instructions
custom_instructions: | The project is already set up with all dependencies installed. The server is already running at localhost:3000. Logs from it are being written to logs.txt. If needed, you can query the db with the 'sqlite3' cli. If needed, use the mcp__playwright set of tools to launch a browser and interact with the app. - MCP Server Configuration
mcp_config: | { "mcpServers": { "playwright": { "command": "npx", "args": [ "@playwright/mcp@latest", "--allowed-origins", "localhost:3000;cdn.tailwindcss.com;esm.sh" ] } } } - Tool Permissions
allowed_tools: "Bash(npm:*),Bash(sqlite3:*),mcp__playwright__browser_snapshot,mcp__playwright__browser_click,..."
Hooks and the SDK
Introducing hooks
Hook은 claude code가 실행되기 전 혹은 후에 실행됨 예를들면 코드가 변경되고 나서 formatter를 돌린다든가, 테스트를 실행하도록 할 수 있음.
settings.json 파일에 직접 작성하거나 /hooks 커맨드를 사용해 추가할 수 있음.
- Code formatting - Automatically format files after Claude edits them
- Testing - Run tests automatically when files are changed
- Access control - Block Claude from reading or editing specific files
- Code quality - Run linters or type checkers and provide feedback to Claude
- Logging - Track what files Claude accesses or modifies
- Validation - Check naming conventions or coding standards
Defining hooks
아래와 같은 과정을 거쳐 hook을 생성하게 됨
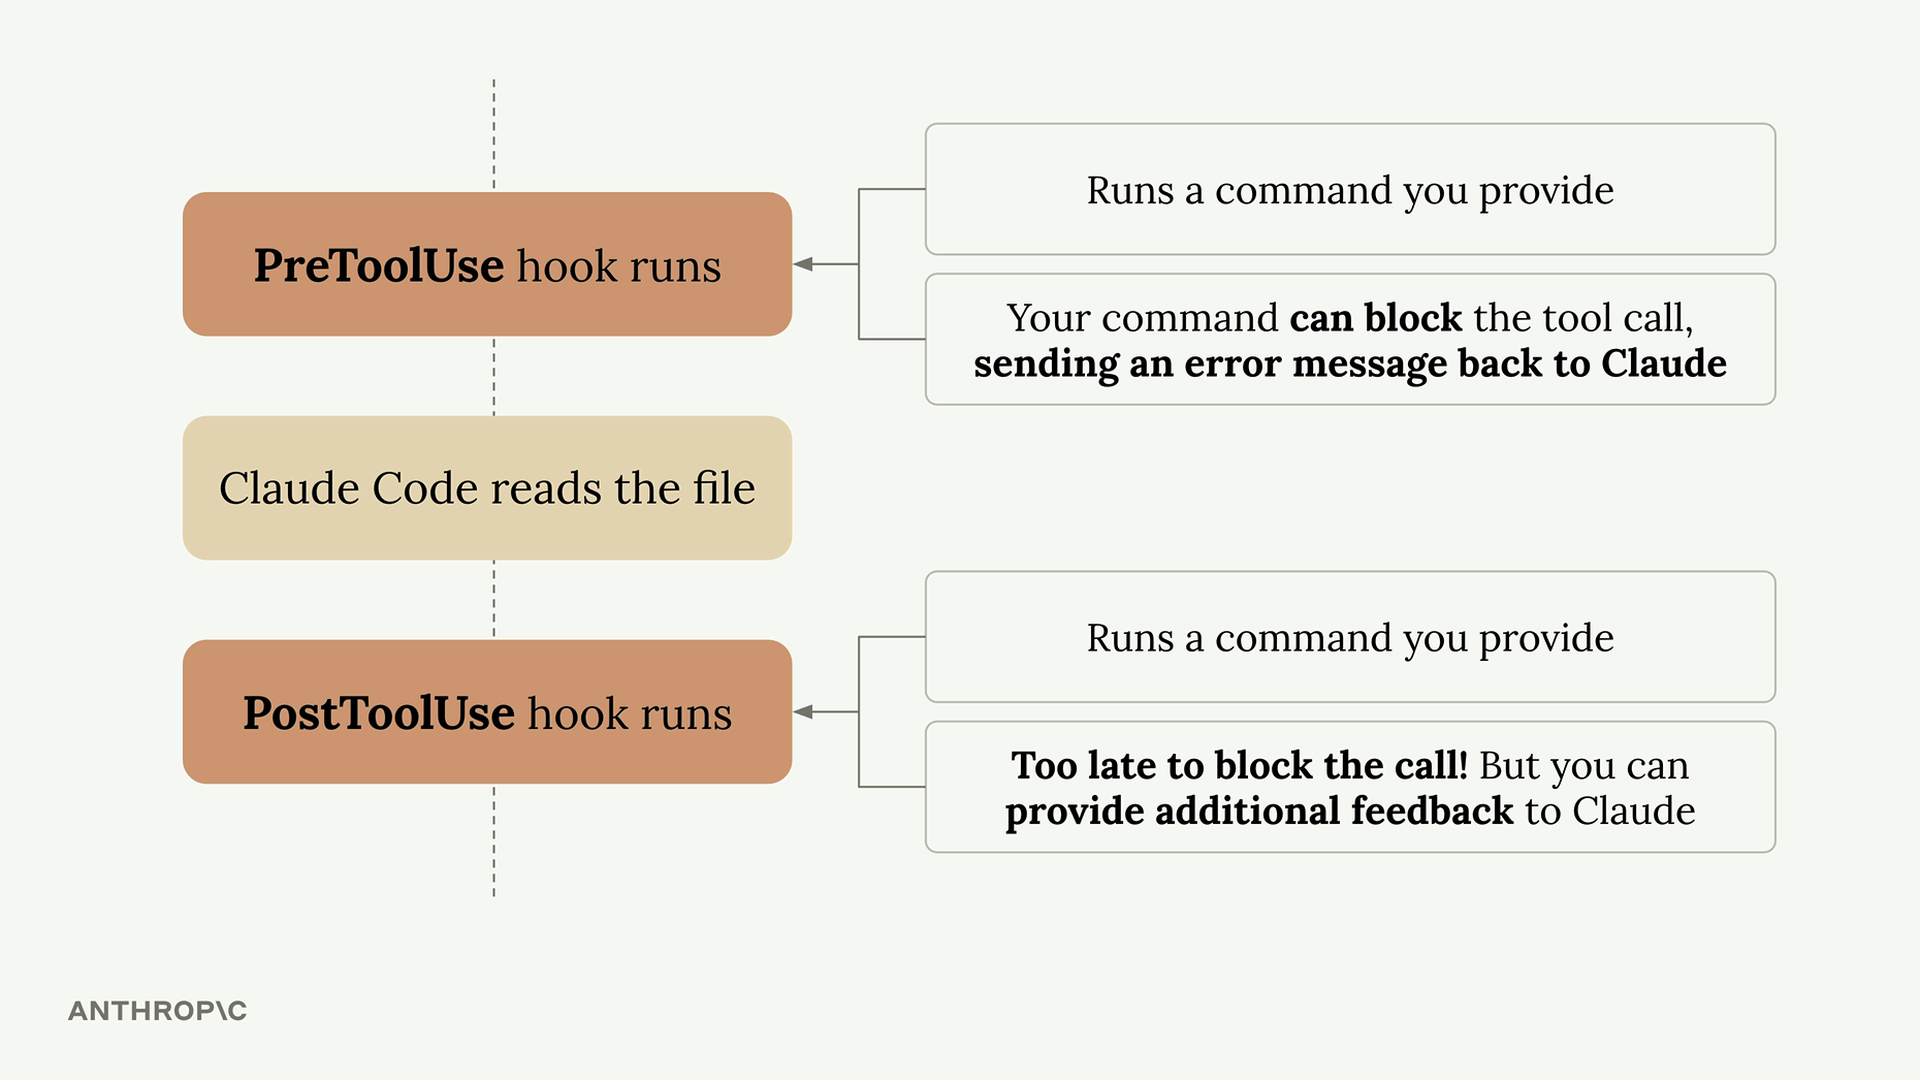
- Decide on a PreToolUse or PostToolUse hook - PreToolUse hooks can prevent tool calls from executing, while PostToolUse hooks run after the tool has already been used
- Determine which type of tool calls you want to watch for - You need to specify exactly which tools should trigger your hook
- Write a command that will receive the tool call - This command gets JSON data about the proposed tool call via standard input
- If needed, command should provide feedback to Claude - Your command’s exit code tells Claude whether to allow or block the operation
예를들어, claude가 .env 파일의 내용을 읽지는 못하게 하고 싶다면, PreToolUse의 hook을 만들어야 함. 그리고 cluade가 Read 혹은 Grep툴을 요청할 때 확인을 해야 함.
{
  "session_id": "2d6a1e4d-6...",
  "transcript_path": "/Users/sg/...",
  "hook_event_name": "PreToolUse",
  "tool_name": "Read",
  "tool_input": {
    "file_path": "/code/queries/.env"
  }
}
위와 같이 Read 툴인데 읽어서는 안되는 파일을 요청하면 읽지 않고 블락하도록 해야 함.
Implementing a hook
이제 위의 내용을 실제로 구현해보자면
먼저 구현할 settings.json파일을 결정함. (글에서는 .claude/settings.local.json로 해서 나만 쓸 로컬 hook으로 구현)
settings.json파일에 hooks항목 아래 중 PreToolUse에 하나를 추가함. Read와 Grep 명령어를 볼 것이기 때문에 matcher에 Read|Grep을 추가하고, command로 우리가 실행할 파일(hook script)을 만들어서 그 경로를 넣어주게 됨.
hook script 파일은 다음과 같은 내용을 가지게 됨:
async function main() {
  const chunks = [];
  for await (const chunk of process.stdin) {
    chunks.push(chunk);
  }

  const toolArgs = JSON.parse(Buffer.concat(chunks).toString());

  // Extract the file path Claude is trying to read
  const readPath =
    toolArgs.tool_input?.file_path || toolArgs.tool_input?.path || "";

  // Check if Claude is trying to read the .env file
  if (readPath.includes('.env')) {
    console.error("You cannot read the .env file");
    process.exit(2);
  }
}
Gotchas around hooks
보안 실천 방법 - 더 안전한 hook을 작성하기 위한 몇 가지 핵심적인 방법:
- 입력 값 검증 및 삭제 (Validate and sanitize inputs) - 입력 데이터를 맹목적으로 신뢰하지 마세요.
- 항상 쉘 변수를 따옴표로 묶기 (Always quote shell variables) -
$VAR가 아닌"$VAR"를 사용하세요. - 경로 순회(Path Traversal) 차단 - 파일 경로에
..가 있는지 확인하세요. - 절대 경로 사용 (Use absolute paths) - 스크립트의 전체 경로를 명시하세요.
- 민감한 파일 건너뛰기 (Skip sensitive files) -
.env,.git/,keys등은 피하세요.
이 중 절대 경로를 사용하라는 것은 path interception 및 binary planting 공격을 완화하는 데 도움이 됨. 하지만 이는 settings.json 파일을 공유하는 것을 어렵게 만듬.
이 문제를 해결하기 위해,프로젝트에는 settings.example.json 파일이 있음. 그 안의 스크립트 참조에는 $PWD placeholder가 포함되어 있고, npm run setup을 실행하면, 일부 종속성이 설치될 뿐만 아니라 scripts 디렉터리 안에 있는 init-claude.js 스크립트도 실행됨. 이 스크립트는 해당 $PWD placeholder를 머신에 있는 프로젝트의 absolute path로 교체하고, settings.example.json 파일을 복사한 후 파일명을 settings.local.json으로 변경함.
이것으로 settings.json 파일을 공유하면서도 권장되는 absolute paths를 계속 사용할 수 있음!
유용한 Hook들
- 타입 checker: ts 파일이 수정될때마다
tsc --noEmit를 실행하게 만들고 -> 에러가 뜨면 exit(2) - Query Duplication Prevention: 새로운 쿼리를 만드려고 시도하기 전에 별도의 claude code를 띄워서 비슷한 쿼리가 존재하는지 질의. 존재한다면 exit(2)
Pre/post tool use 외에 다음과 같은 Hook도 있음:
- Notification - Claude Code가 알림을 보낼 때 실행. 이는 Claude가 도구를 사용하는 데 권한이 필요하거나, Claude Code가 60초 동안 유휴 상태일 때 발생
- Stop - Claude Code가 응답을 마쳤을 때 실행
- SubagentStop - subagent(UI에서는 “Task”로 표시됨)가 완료되었을 때 실행
- PreCompact - 수동 또는 자동으로 compact 작업이 발생하기 전에 실행
hook을 만들 때 주의사항:
- 명령어로 들어오는 stdin 입력은 실행되는 hook의 유형(PreToolUse, PostToolUse, Notification 등)에 따라 변경됨
- tool_input에 포함된 내용은 호출된 도구에 따라 달라짐 (PreToolUse 및 PostToolUse hook의 경우)
아래와 같은 hook을 사용해서 hook에 대한 입력을 post-log.json 파일에 기록하여 확인해보는 것이 권장됨:
"PostToolUse": [ // 또는 "PreToolUse", "Stop" 등
  {
    "matcher": "*",
    "hooks": [
      {
        "type": "command",
        "command": "jq . > post-log.json"
      }
    ]
  },
]
Claude Code SDK
Python, TS, commandline에서 claude code SDK를 사용할 수 있음. 기본적으론 Read만 가능하고, settings.json이나 아니면 코드에 명시적으로 다른 tool을 주어야 다른 기능도 사용 가능.
import { query } from "@anthropic-ai/claude-code";

const prompt = "Look for duplicate queries in the ./src/queries dir";

for await (const message of query({
  prompt,
  options: {
    allowedTools: ["Edit"]
  }
})) {
  console.log(JSON.stringify(message, null, 2));
}
다음과 같은 상황에서 유용하게 사용할 수 있음:
- Git hooks that automatically review code changes
- Build scripts that analyze and optimize code
- Helper commands for code maintenance tasks
- Automated documentation generation
- Code quality checks in CI/CD pipelines